Understanding NASCAR Diecast Design
Designing a NASCAR diecast model is a blend of engineering, artistry, and passion for motorsports. It involves translating the complex shapes and details of a real race car into a miniature, collectible form. This guide will walk you through the essential steps, from initial concepts to the final assembly. The process requires understanding various aspects of car design, material science, and manufacturing techniques. Whether you’re a seasoned modeler or a complete beginner, this guide provides a comprehensive overview to help you create your own NASCAR diecast.
The Core Components of a Diecast Car
A NASCAR diecast car, despite its small size, is a complex assembly of several key components. Understanding these parts is fundamental to the design process. The chassis provides the structural foundation, the body dictates the car’s aesthetics and aerodynamics, and the wheels and tires are essential for both visual accuracy and the overall look. Paying close attention to each element ensures that the final product is a faithful and detailed representation of a real NASCAR vehicle. Each part plays a vital role in the diecast model’s authenticity and appeal.
Chassis Design and Materials

The chassis is the backbone of your diecast model, determining its stability and structural integrity. Traditionally, diecast chassis are made of metal alloys, such as zinc or aluminum, providing weight and durability. The design must accurately reflect the real-world chassis, including suspension components, exhaust systems, and any visible details. Consider the scale of your model when designing the chassis; even small inaccuracies can be magnified in the final product. Achieving a balance between realism and manufacturability is crucial for a successful diecast chassis design. Remember to incorporate mounting points for other components to ensure proper assembly.
Body Design and Aerodynamics
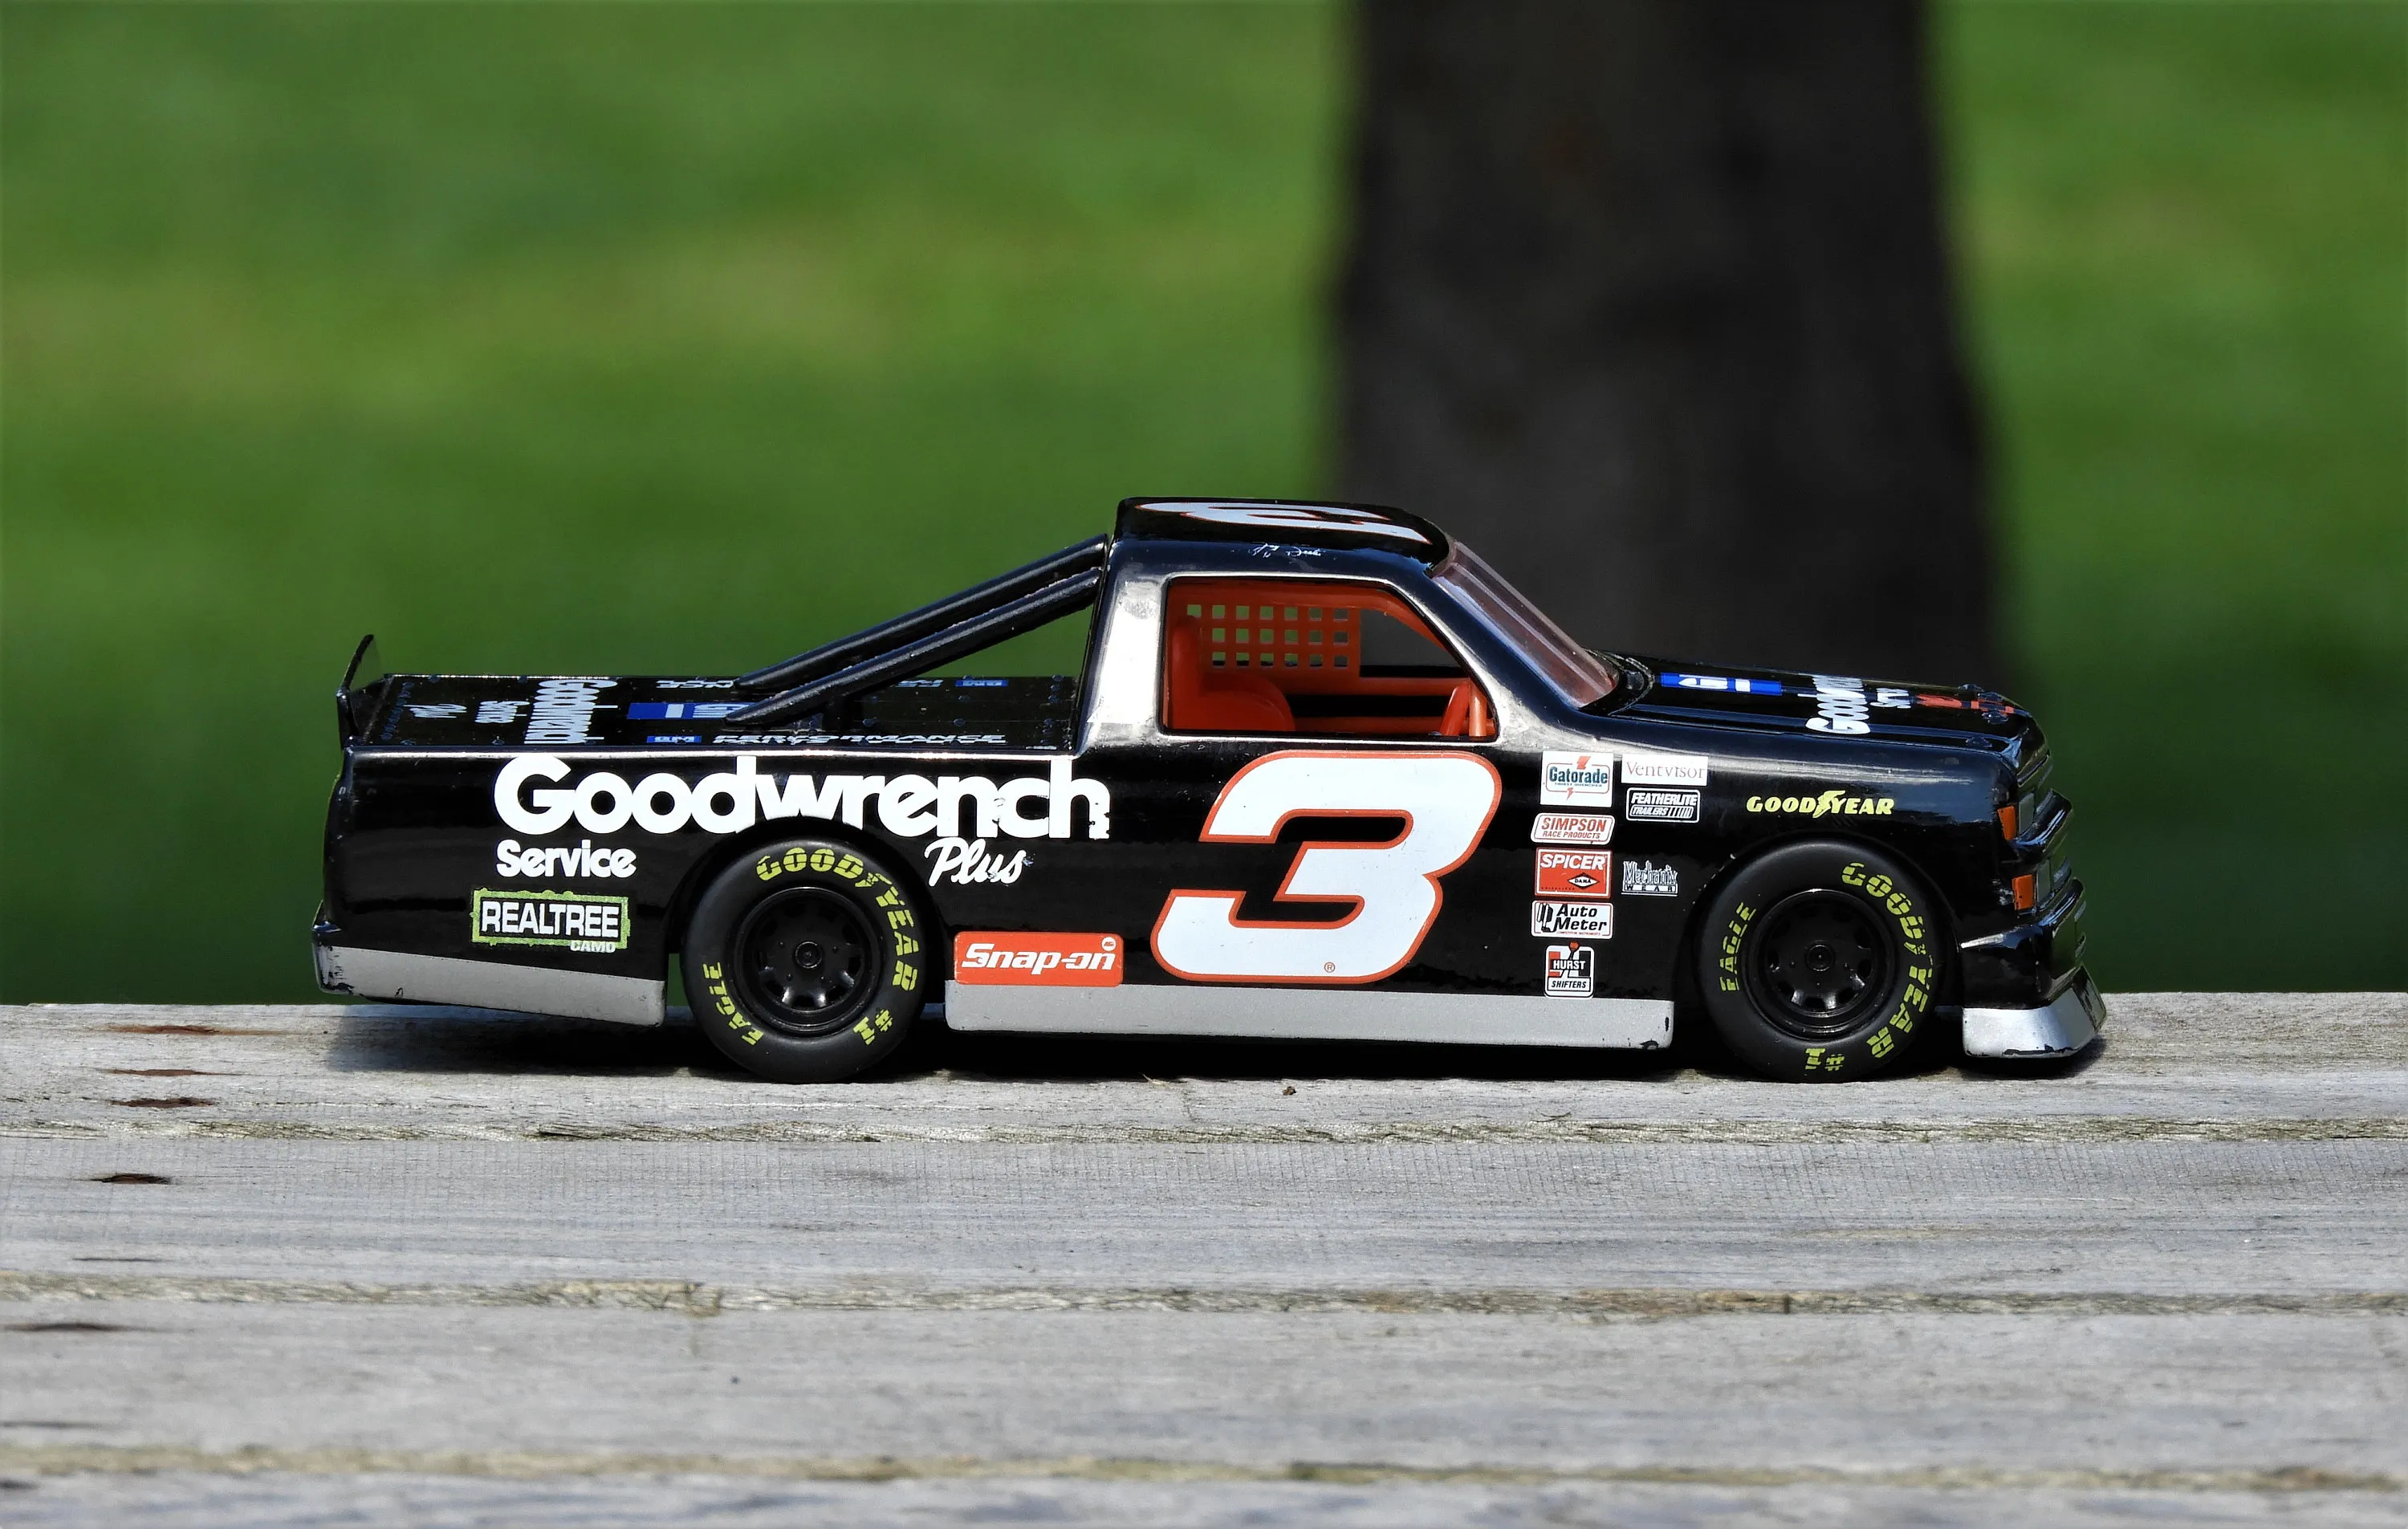
The body of the diecast model is what gives the car its distinctive look. In NASCAR, the body shape is crucial for aerodynamics. Modern design software allows you to accurately replicate the curves, spoilers, and other aerodynamic elements of a NASCAR race car. Consider the paint scheme, decals, and sponsor logos when designing the body. Ensure that the body design complements the chassis, providing a seamless and realistic appearance. The body should also incorporate features such as windows, grilles, and lighting details. The attention to detail in the body design contributes significantly to the overall realism of the diecast model, attracting collectors and enthusiasts.
Wheels and Tires Details
Wheels and tires are more than just functional components; they greatly influence the visual appeal of the model. Accurate replication of tire tread patterns, wheel designs, and rim details is essential for a realistic look. The wheels and tires should be proportionate to the body and chassis, ensuring the correct stance and overall proportions. Consider the materials used, such as rubber for tires, which can add authenticity. The wheel design must complement the overall aesthetic of the car. The tires can also have printed sidewall markings. When creating these components, precision and attention to detail are key to enhancing the model’s authenticity. The wheels and tires can significantly impact the overall visual appeal of the diecast model.
Choosing Your Design Software

Selecting the right design software is critical for success. The best software for you will depend on your experience level and the complexity of your projects. Several CAD (Computer-Aided Design) programs are available, each with its strengths and weaknesses. Consider features such as ease of use, modeling capabilities, and compatibility with manufacturing processes. Many options offer free trial periods or educational licenses, providing an opportunity to experiment with different software packages before making a purchase. Selecting the right software can streamline the design process, and help you achieve a professional result. Consider the scalability of the software, so you can handle more complex designs.
Essential Software Features
Key software features include 3D modeling tools, allowing you to create intricate shapes and surfaces. Rendering capabilities are also important, enabling you to visualize the final product with realistic textures and lighting. Support for importing and exporting various file formats ensures compatibility with manufacturers. User-friendly interfaces and tutorials are especially important for beginners. Some software packages offer specialized tools tailored to the automotive industry. Consider features such as precise measurement tools, simulation capabilities, and the ability to create detailed drawings for manufacturing. Always check the availability of tutorials and user communities. These features will make the design process more efficient and enjoyable.
Recommended Software Options
Popular choices include industry-standard software such as SolidWorks, known for its robust features and versatility, and Fusion 360, which is often favored for its accessibility and affordability. Blender is a great option, offering powerful modeling capabilities. AutoCAD is a good choice, known for its precision and ease of use. Consider the software’s learning curve and the availability of online resources when making your choice. Research user reviews and compare the features of different software packages. Before investing in a license, try the free trial period. The ideal software will depend on your specific requirements and prior experience.
Detailed Design Process

The design process involves several critical steps, from initial concepts to the final product. The first step is conceptualization and sketching. Once the design is finalized, you’ll move onto creating 3D models. Textures and graphics are added to refine the appearance of the model. This iterative process allows you to refine your design and prepare it for manufacturing. Each step requires precision, attention to detail, and a good understanding of design principles. This process is essential for bringing your design to life, ensuring a high-quality diecast model.
Conceptualization and Sketching
Begin by gathering reference materials of the NASCAR car you wish to model, including photos, diagrams, and specifications. Sketching allows you to explore different design ideas and refine the overall look of the diecast model. Consider the scale of the model and how it affects the level of detail you can include. Use these sketches to establish proportions and identify key design elements, like the body shape, sponsor placement, and overall aesthetics. Make multiple sketches, experimenting with different angles and perspectives. Conceptualization and sketching are vital for creating a solid foundation, before you move on to 3D modeling, helping you visualize and plan your design. This stage will allow you to create a clear roadmap for the design.
Creating 3D Models
Using your chosen software, start creating the 3D model based on your sketches. Begin by modeling the chassis, ensuring that it accurately reflects the real-world counterpart. Create the body shape, focusing on its aerodynamic features, like the spoiler and side skirts. Add details such as windows, grilles, and lights, paying attention to the precise placement and shape. Make sure to keep the scale in mind during modeling to guarantee correct proportions. Use the software’s tools to refine the curves and surfaces. Continuously check the model from different angles to spot any inconsistencies or flaws. Consider the functionality of the design, ensuring all the parts fit correctly together. This stage will transform your sketches into a virtual, three-dimensional representation of the model.
Adding Textures and Graphics

Once the 3D model is complete, it’s time to add textures and graphics to bring your diecast model to life. Use the software’s texturing tools to add realistic materials to various components, like metal for the chassis and glossy paint for the body. Apply decals and sponsor logos, ensuring they are accurately placed and sized. Experiment with different lighting and rendering options to make the model visually appealing. Refine the textures and graphics until they match the desired aesthetic and realism. The correct use of textures and graphics helps enhance the model’s appearance and adds a professional finish. Properly applied textures and graphics are crucial for capturing attention.
Preparing for Manufacturing
Before you can have your diecast model manufactured, you must prepare your 3D model for production. This involves creating files that can be used by manufacturing facilities. Understanding the different file formats and specifications is critical. Also, knowing the nuances of collaborating with manufacturers ensures a smooth and efficient production process. This step is essential to turn your digital design into a physical diecast model.
File Formats and Specifications
Common file formats for diecast manufacturing include STL, STEP, and IGES. These formats are generally accepted by manufacturers. Make sure your files are optimized for the specific manufacturing process, such as die-casting or 3D printing. The specifications must be accurate; small errors can result in significant problems. Refer to the manufacturer’s guidelines for file format and specifications. Ensure that the model is properly scaled and that all parts are correctly aligned. The selected file format and specifications will dictate how the design is converted to a physical product. Double-checking the information is necessary to avoid errors.
Working with Manufacturers

Collaborate closely with your chosen manufacturer throughout the process. Discuss your design, specifications, and any special requirements you may have. Provide detailed drawings and 3D models, with clear instructions. Be open to feedback and suggestions from the manufacturer, as they have extensive experience in diecast production. Clarify all technical aspects with the manufacturer to prevent misunderstandings. Request samples or prototypes of your design to verify the quality and accuracy before the mass production. The relationship with your manufacturer is crucial to the successful realization of your diecast model. Clear communication and collaboration with the manufacturer ensure that your vision becomes a reality.
Ensuring Quality Control
Quality control is essential at various stages, including during the design, and the manufacturing process. Examine your 3D model for any flaws or imperfections. Conduct thorough reviews of the prototype or samples provided by the manufacturer. Check for dimensional accuracy, finish quality, and overall assembly. Implement a checklist to ensure all parts are correctly assembled. Pay close attention to details, such as decal alignment and paint quality. Quality control will help you catch any issues before full-scale production, and help ensure a high-quality diecast model.
Final Touches and Finishing
The finishing touches transform a diecast model from a set of individual parts to a complete and appealing collectible. The final steps involve the application of decals and paint, and the assembly of all components. Proper attention to these details will ensure that the model meets your standards and captures the essence of the original NASCAR car. These final details are what make the diecast model stand out from the rest, making the car more appealing to collectors.
Applying Decals and Paint

The paint and decals are essential for replicating the look of a real NASCAR race car. Choose paint colors that match the car’s design. Apply multiple coats of paint, ensuring even coverage and a smooth finish. Carefully apply the decals, making sure they are aligned accurately and free of bubbles or wrinkles. Consider using clear coats to protect the paint and decals from damage and add a glossy sheen. Precision and attention to detail in applying paint and decals are critical for the authenticity and visual appeal of the model. These final touches add to the overall look, making the model complete.
Assembling the Diecast Model
The final step is to assemble all the components, from the chassis and body to the wheels and interior. Follow the manufacturer’s instructions for assembly, ensuring each part fits correctly. Pay attention to small details, such as the placement of mirrors, spoilers, and other accessories. Use the right tools and adhesives, and take your time. Once assembled, inspect the model for any flaws or imperfections. By following this guide, you can assemble a highly detailed and impressive diecast model. This is the last stage in creating your diecast model, so take your time to create a final, complete product.